HOW TO
What to do if your Elite Capellix liquid CPU cooler is not detected by iCUE
If your iCUE Elite Capellix liquid CPU cooler is not being detected by iCUE or lighting up, follow the steps below in order. Make sure you restart your system after completing each section or when the instructions ask you to.
Step 1: Ensure iCUE is up to date
The first thing to do is make sure your iCUE software is updated to the latest version. You can update iCUE from within the software or download the latest version of iCUE from this page.
If iCUE is up to date, you can try to repair iCUE:
- Open the iCUE installer.
- Select the Repair option.
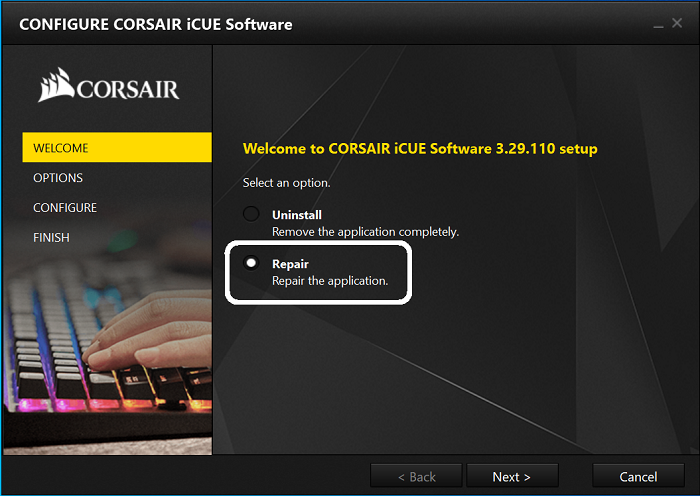
- Follow the prompts to repair iCUE.
- Restart your system after it is completed.
Step 2: Check if your Elite Capellix is receiving power
If repairing iCUE does not resolve your issue, the next step is to see if your Elite Capellix is receiving power. If the fans are spinning, the pumps are running, and the LEDs are lit up, your Elite Capellix is receiving power.
- Ensure all connections to the Elite Capellix are plugged in fully and free of debris.
- Make sure you are using the SATA power cable that came with your power supply unit.
- Try using another SATA connector on the cable, if you have one available.
- If your Elite Capellix does not receive power and you have checked all connections, try testing another device on the same SATA connection, if possible.
- If another unit received power when on the same SATA connection, your Elite Capellix may be defective.
If your Elite Capellix is receiving power but is not being detected:
Check that your cables are plugged into internal USB 2.0 headers. Some motherboards have headers that look similar to USB headers but are not actually USB headers.
Make sure that the header is USB and, if the header does not have a plastic guide around it, make sure that the connector is plugged in to all the pins.
Step 3: Check programs and devices
If your Elite Capellix is still not being detected, try checking if the issue is being caused by other programs or devices.
The first step is to check for programs that may be interfering with the Elite Capellix and close them. Programs that are likely to cause conflict include but are not limited to:
- RGB Fusion
- Synapse
- Aura Sync
- Armory Crate
- GHub
- Mystic Light
- Dragon Center
- Aida64
- HwInfo64
Next, make sure that your Windows system is up to date with all major, critical, and optional updates.
Finally, check Bluetooth and other devices in your system settings and see if you can see the Elite Capellix and the Commander Core.
- If you see Elite Capellix and iCUE still is not detecting it, try unplugging the USB header from the cooler (make sure you only unplug the USB header), then plug it back in.
-
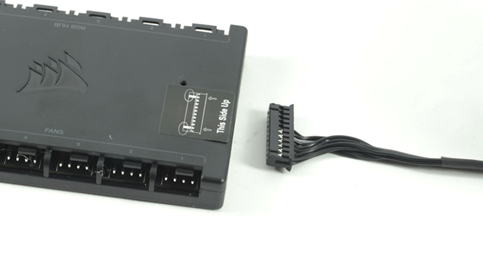
If you only see the Commander Core, power down your system and make sure that the cable from your Elite Capellix is fully and correctly plugged in to your Commander Core.
Step 4: Force refresh your Elite Capellix
If your Elite Capellix is still not being detected, try force refreshing the cooler.
- Close iCUE completely.
- Go to Bluetooth and other devices in your system settings.
- Scroll down until you see CORSAIR iCUE Commander CORE.
- Click the device and select Remove device.
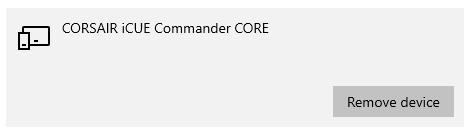
- When asked if you want to remove the device, click Yes.
- After CORSAIR iCUE Commander CORE is removed, open iCUE.
- Open Device Manager from Control Panel.
- Click Action and select Scan for hardware changes.
Windows should re-detect the Elite Capellix and iCUE should now be detecting your Elite Capellix.
If your Elite Capellix is still not being detected by iCUE after trying the above steps, contact Customer Support and we will help you with the issue.
RELATED CONTENT


