HOW TO
How to: Set up the CORSAIR Hydro X Series XD7 RGB Pump/Reservoir combo
Need help setting up your Hydro X Series XD7 RGB Pump/Reservoir combo? We have a video and this guide to help you out.
- Box contents
- Setting up the XD7
- Optional: Installing the temperature probe
- Filling the XD7
- Video instructions
Box contents
The box containing the XD7 should have the following parts:
- XD7 Pump/Reservoir combo
- G1/4 plugs
- Temperature probe
- Mounting screws
- ARGB adapter
- 24-pin jumper
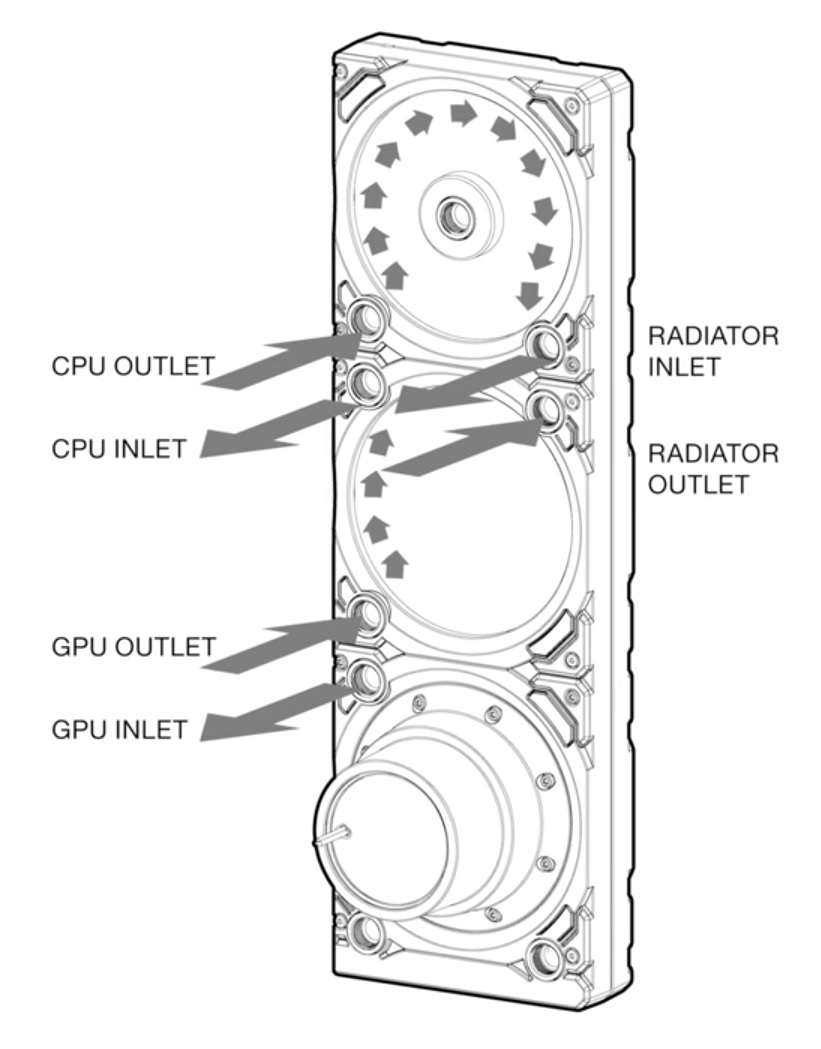
Setting up the XD7
To set up your XD7:
- Mount the XD7 to a case fan bracket or directly in your PC system case.
- Use the diagram below for the recommended positioning of the XD7.
-
NOTE: The bottom two ports should be used for drain ports only.
-
NOTE: The bottom two ports should be used for drain ports only.
- Install the XD7 into your PC system case.
- Attach the tube fittings onto the XD7 ports.
- Connect the tubing to the XD7 and your other Hydro X series components.
Optional: Installing the temperature probe
If you want to install a temperature probe, you can:
- Install a Y-splitter adapter fitting onto any inlet/outlet port on the XD7 EXCEPT the Fill or Drain ports, then install the temperature probe onto the Y-splitter adapter fitting.
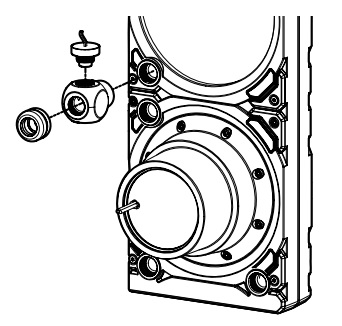
- Install the temperature probe onto an unused port on a GPU block.
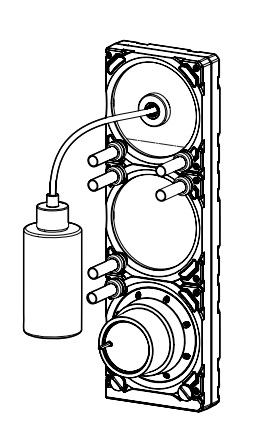
Filling the XD7
Once you have finished setting up the XD7, it is time to fill it with coolant.
NOTE: Make sure your power supply unit is turned off and disconnected from all of your computer components when filling the XD7.
- Remove the G1/4 plug from the top of the XD7.
- NOTE: Make sure any other unused G1/4 ports are plugged.
- Use a bottle to fill the XD7 with coolant.
- Connect the enclosed 24-pin jumper to your PSU's 24-pin ATX cable.
- Disconnect the XD7 pump's 4-pin fan connector from your motherboard/fan controller; this will force the pump to run at 100% speed to make filling easier.
- Connect the PSU to power and turn it on to run the pump; the coolant will start flowing through the system.
- Before the reservoir runs out of coolant, turn the PSU off.
- IMPORTANT: Do NOT let the pump run dry or the reservoir run out of coolant, as this can damage the pump.
- Repeat steps 5 and 6 until the XD7 maintains its coolant level.
- NOTE: We recommend not filling the reservoir up to more than 4cm (1.5") from the top.
- Let the pump run for about 24 hours to get rid of any air trapped in the components and to ensure there are no leaks.
- After leak-testing the system, turn off the PSU and disconnect the 24-pin jumper.
- Reconnect the power to your other computer peripherals and turn on your computer.
Video instructions
RELATED CONTENT


