HOW TO
方法NVIDIA RTX 3080 / 3090 Founders Edition用HYDRO XシリーズXG7ウォーターブロックの取り付け
Need help installing your HYDRO X Series XG7 Water Block for your NVIDIA RTX 3080 or 3090? We have a video that can help you get your water block up and running.
Tools to use
To install your water block, you will need the following screwdrivers:
- PH1
- T5
- T6H
- T8H
Video instructions
Step one: Removing the graphics card
The first step to installation is to remove the graphics card from the heat sink fan assembly.
- Remove any covers and screws securing the backplate to your graphics card.
- We recommend using a piece of strong tape to remove the four small screw covers.
- Remove the PCI slot mounting bracket from your graphics card.
- (Optional) If you have an XG7 3090, replace the PCI slot mounting bracket with the dual socket bracket included with the water block.
- Disconnect all cables connected from the heat sink fan assembly.
- Remove the screws that are securing the graphics card to the heat sink fan assembly.
- Gently remove the graphics card from the heat sink fan assembly.

- Wipe off the original thermal compound and remove the thermal pads.
- Use isopropyl alcohol, if necessary.
Step two: Installing the water block
Once you have removed the graphics card from the heat sink fan assembly, you can now install the water block.
- Route the wiring through the rear of the water block.
- Remove the TIM cover and place the water block on a smooth surface with the cover and acrylic glass facing downwards.
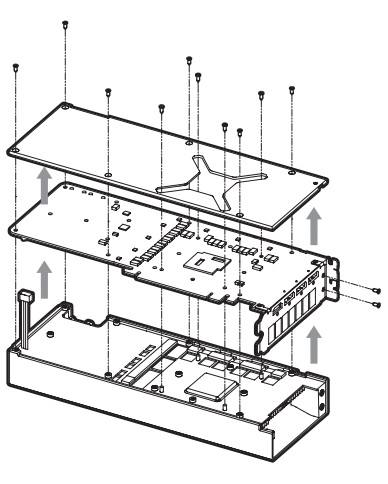
- Carefully place your bare graphics card onto the water block with pre-installed thermal material.
- Make sure to carefully align the holes of the graphics card with the holes in the water block.
- Reinstall the PCI slot mounting bracket.
- Place the provided backplate of the water block over the graphics card.
- Make sure to carefully align the holes of the backplate with the holes of the graphics card.
- Use a Phillips-head screwdriver to secure the water block assembly with the enclosed M2.5x5mm screws.
- Use the included RTGB adapter cable to connect the water block assembly to a Corsair RGB lighting controller, another Hydro X series component, or a motherboard RGB header.