매뉴얼 | 빠른 시작 가이드
iCUE LINK TITAN RX RGB
RGB 팬이 장착된 고성능 AIO CPU 쿨러

시작하기 전에
알아보기
1. iCUE LINK TITAN RX RGB
TITAN 240 RX RGB

TITAN 280 RX RGB

TITAN 360 RX RGB

타이탄 420 RX RGB
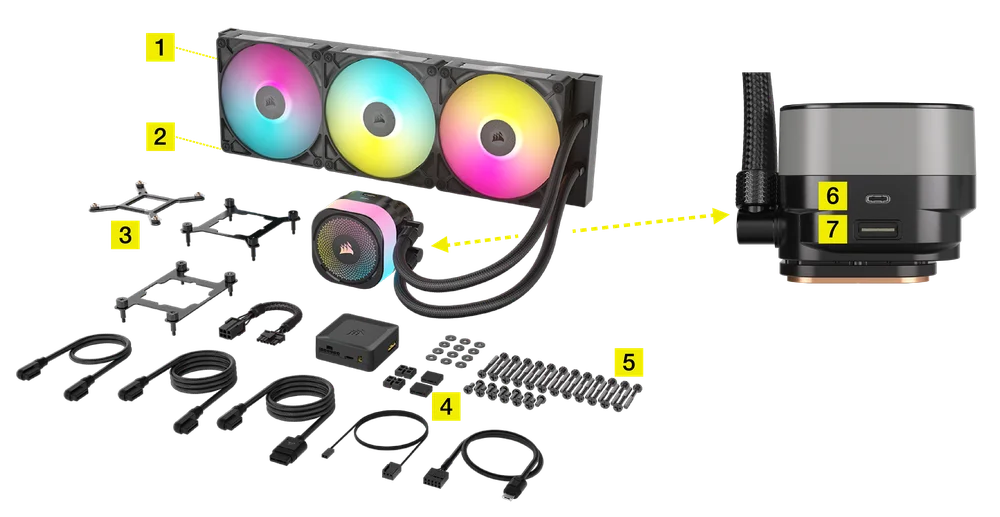
2. iCUE LINK RX RGB FANS
RX RGB에 미리 설치된장식판(3)은 분리할 수 있습니다. 팬은 장식판의 유무에 관계없이 사용하실 수 있습니다.

3. iCUE LINK SYSTEM HUB

포함된 하드웨어

1x 인텔 LGA 1851/1700
마운팅 브래킷
(사전 설치)

1x 인텔 LGA 1851/1700
백플레이트

1x AMD AM5/AM4
마운팅 브래킷 세트

16개 장축 팬 나사 (240 | 280)
24개 장축 팬 나사 (360 | 420)

라디에이터 나사 8개 (240 | 280)
라디에이터 나사 12개 (360 | 420)

8x 와셔 (240 | 280)
12x 와셔 (360 | 420)

2x RX RGB (240 | 280)
3x RX RGB (360 | 420)

1x 시스템 허브

1x 150mm PCIe 전원 케이블

1x 500mm 마이크로 USB 2.0 케이블

1x 800mm 타치 케이블

1x 250mm iCUE LINK 케이블(듀얼 90° 커넥터 포함)

1x 600mm iCUE LINK 케이블(듀얼 90° 커넥터 포함)

1x 600mm iCUE LINK 케이블(직선/90° 커넥터 포함)
준비 iCUE LINK TITAN RX RGB 설치용
1. 연결 iCUE 링크 케이블
- 아래 그림과 같이 iCUE LINK 케이블(L, M)을 라디에이터에 장착된 RX RGB 팬에 연결합니다.

2. iCUE 링크 케이블을 연결하세요
- 긴 iCUE LINK 케이블(N)을 펌프에서 가장 가까운 컷아웃을 통해 배선합니다.

3. 타치 케이블 연결
- 3핀 1선 타치케이블(K)을 마더보드의 CPU_FAN 헤더에 연결한 다음, 마더보드 트레이 뒤로 배선합니다.

인텔 설치
1. 백플레이트 설치
- 인텔 LGA 1851/1700 백플레이트(B)의 접착면 보호 필름을 제거합니다.
- 백플레이트(B)를 정렬한 다음, 마더보드 뒤의 접착면이 아래로 향하게 하여 부착합니다.

2. 펌프 유닛 설치
- 나사를 정렬하고 후면 플레이트 위로 펌핑한 다음 반대쪽 모서리에서 십자형으로 나사를 조입니다.
- 네 모서리 모두 조여질 때까지 브래킷(A) 나사를 조입니다.

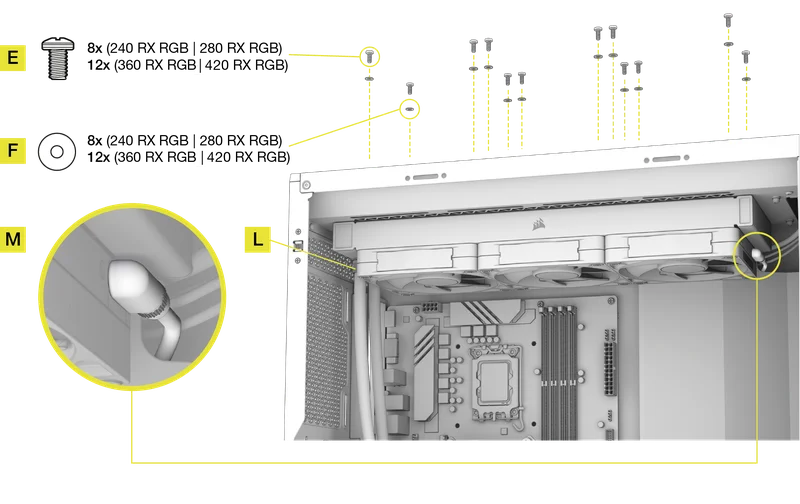
3. 라디에이터 설치
- 짧은케이블(L)의 다른 쪽 끝을 후면 팬에 삽입한 다음, 그림과 같이 짧은 나사(E)와 와셔(F)를 사용하여 케이스 내부에 라디에이터를 장착합니다.
- 600mm iCUE LINK 케이블(M)을 마더보드 트레이 뒤로 배선합니다.
AMD 설치
1. AMD 마운팅 브래킷 설치
- 사전 설치된 인텔 마운팅 브래킷(A)을 AMD 마운팅 브래킷(C)으로 교체하십시오.

2. 설치 준비
- 표시된 기존 AMD AM5/AM4 장착 브래킷을 제거합니다.

3. 펌프 유닛 설치
- 나사를 정렬하고 후면 플레이트 위로 펌핑한 다음 반대쪽 모서리에서 십자형으로 나사를 조입니다.
- 네 모서리 모두 조여질 때까지 브래킷(C) 나사를 조여 주세요.

4. 라디에이터 설치
- 짧은케이블(L)의 다른 쪽 끝을 후면 팬에 삽입한 다음, 그림과 같이 짧은 나사(E)와 와셔(F)를 사용하여 케이스 내부에 라디에이터를 장착합니다.
- 600mm iCUE LINK 케이블(M)을 마더보드 트레이 뒤로 배선합니다.
타이탄 RX RGB 펌프 연결
- 600mm iCUE LINK 케이블(N)의 90° 커넥터를 펌프에 삽입합니다.

iCUE LINK SYSTEM HUB 설치
1. iCUE 링크 케이블 연결하기
- iCUE LINK 케이블(M, N)을 시스템 허브(H)에 연결합니다.

2. 전원 케이블 연결
- 6핀 마이크로핏 커넥터(I)를 시스템 허브(H)에 연결합니다.
- 6핀 PCIe 커넥터(I)를 전원 공급 장치의 전용 PCIe 전원 케이블에 연결합니다.

3. 데이터 케이블 연결
- 마이크로 USB 케이블(J)을 시스템 허브(H)에 연결합니다.
- 9핀 USB 커넥터(J)를 마더보드의 USB 2.0 헤더에 연결합니다.

4. 연결 타치 케이블
- 2핀 1선 타치 케이블(K)을 시스템 허브(H)에 연결합니다.

5. 마운트 시스템 허브
- 케이스 내부에 마그네틱 또는 제공된 테이프로시스템 허브(H)를 장착합니다.

소프트웨어 설치
비디오 튜토리얼
포괄적인 iCUE 설정 비디오 가이드를 참조하세요. 이 시각적 가이드는 아래의 글에 자세히 설명된 iCUE 설정에 대한 단계별 안내를 제공합니다.
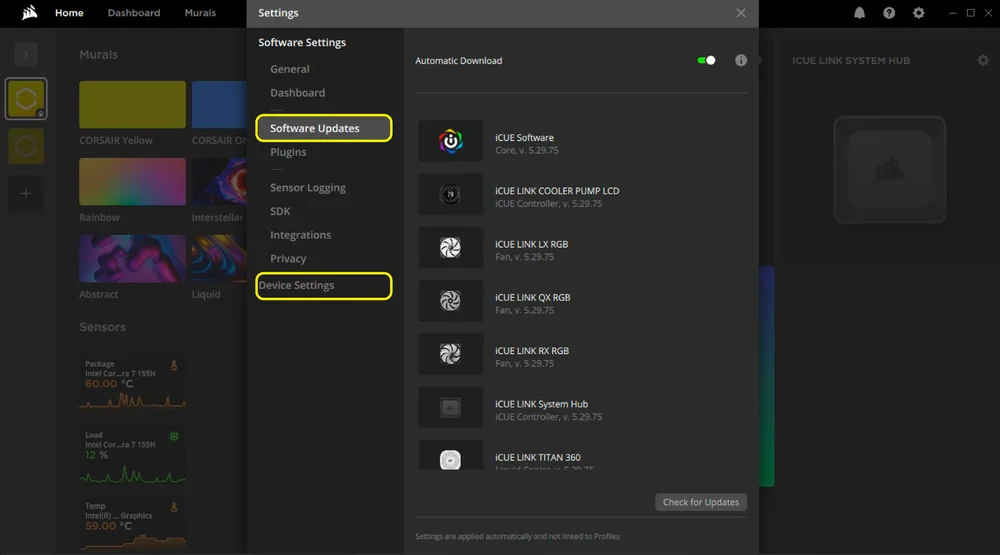
1. iCUE 설치
2. 연결된 장치의 펌웨어 업데이트
- iCUE가 설치되면 소프트웨어를 실행하십시오. 연결된 장치 중 펌웨어 업데이트가 필요한 장치가 있으면 오른쪽 상단 모서리에 알림이 표시되어 업데이트를 수행하라는 메시지가 표시됩니다. 설정(오른쪽 상단 모서리에 있는 톱니바퀴 아이콘)을 클릭하여 소프트웨어 및 펌웨어 업데이트를 수동으로 확인할 수도 있습니다.
3. 조명 설치
빠른 조명 설치
- iCUE 홈 화면에서 미리 정의된 벽화 효과를 선택하여 조명 효과를 빠르게 변경할 수 있습니다.

조명 설정
조명 설정 페이지에는 시스템 허브에 연결된 모든 iCUE LINK 장치가 표시되며, 시스템 내의 물리적 배치와 더 잘 일치하도록 장치를 재정렬할 수 있습니다.
- 시스템 허브 타일을 마우스오버하고 조명 설정을 선택합니다.

- iCUE LINK 장치를 설정에 맞게 다시 정렬하십시오.
- 필요한 경우 오른쪽에 있는 상자 아이콘을 클릭하면 창 안에 있는 모든 장치를 표시할 수 있습니다.

조명 효과
iCUE 소프트웨어가 실행될 때 어떤 조명 효과를 표시할지 선택하세요:
- 네비게이션 바에서 iCUE LINK TITAN RX RGB AIO 또는 RX RGB를 선택합니다.
- "조명 효과"를 클릭하여 조명 효과 페이지에 액세스하고 원하는 조명 효과를 선택합니다.
- "조명 레이어" 아래의 "+" 아이콘을 클릭하여 추가 조명 효과를 추가하십시오.

기기 메모리 모드
iCUE 소프트웨어가 실행되지 않을 때, 보통 컴퓨터 시작 단계에서 어떤 조명 효과를 표시할지 선택합니다.
- 네비게이션 바에서 iCUE LINK TITAN RX RGB AIO 또는 RX RGB를 선택합니다.
- 버튼을 클릭하여 장치 메모리 모드를 전환하십시오.
- 원하는 설정을 선택한 후, 저장 아이콘을 클릭합니다.

4. 냉각 설정
AIO 팬 설정
- 네비게이션 바에서 iCUE LINK TITAN RX RGB AIO를 선택합니다.
- "팬 설정"을 클릭하고 "마법사 실행"을 클릭합니다.

라디에이터에 장착된 팬을 식별합니다. iCUE는 선택된 팬에 AIO 기반 팬 곡선을 자동으로 할당합니다.
- UI를 클릭하여 라디에이터에 장착된 팬을 선택한 다음 "완료"를 클릭합니다.

냉각 성능
시스템 허브에 연결된 다른 팬에 대해 원하는 냉각 프리셋을 조용, 균형, 극단 중에서 선택하거나 자신만의 곡선을 만드십시오.
- 네비게이션 바에서 iCUE LINK TITAN RX RGB 또는 RX RGB를 선택합니다.
- "냉각"을 클릭하여 냉각 성능 페이지에 액세스하십시오.
- 각 장치에 대해 원하는 냉각 프리셋을 선택합니다.
- "냉각 사전 설정" 아래의 "+" 아이콘을 클릭하여 사용자 지정 팬 곡선을 만듭니다.

기기 메모리 모드
iCUE 소프트웨어가 실행되지 않을 때(보통 컴퓨터 시작 단계에서) 팬(들) 및/또는 펌프가 어떻게 작동할지 선택하십시오.
- 네비게이션 바에서 iCUE LINK TITAN RX RGB AIO 또는 RX RGB를 선택합니다.
- 버튼을 클릭하여 장치 메모리 모드를 전환하십시오.
- 원하는 설정을 선택한 후, 저장 아이콘을 클릭합니다.

5. 추가 설정
추가적인 설정, 구성 및 팁을 보려면 CORSAIR LAB 유튜브 채널과 Explorer 페이지를 방문하십시오.
자주 묻는 질문
시스템 허브에 전원을 공급하기 위해 PCIe 어댑터 케이블을 사용하는 것이 안전한가요?
시스템 허브와 iCUE LINK 장치의 올바른 작동을 위해, 제공된 6핀 암 커넥터를 전원 공급 장치의 전용 PCIe 전원 케이블에 직접 연결하십시오. 시스템 허브 PCIe 전원 케이블과 전원 공급 장치 사이에 SATA-PCIe 어댑터 케이블을 연결하면 iCUE LINK 장치 및/또는 시스템 전체의 성능에 부정적인 영향을 미칠 수 있습니다.
CapSwap 기술이란 무엇이며, iCUE LINK TITAN RX RGB CPU 쿨러와 어떻게 작동하는 것일까요?

CapSwap을 사용하면 펌프 캡을 iCUE LINK 펌프 캡 그루브(별도 판매)와 같은 미적 모듈이나 iCUE LINK LCD 모듈(별도 판매)과 같은 기능적 모듈로 쉽게 교체하여 iCUE LINK TITAN RX RGB CPU 쿨러를 맞춤화할 수 있습니다. 호환 가능한 CapSwap 모듈 목록을 보려면 이 링크를 방문하십시오.
iCUE LINK TITAN RX RGB 펌프에 USB Type-C 케이블을 연결해야 합니까?

아니요, iCUE LINK TITAN RX RGB가 제대로 작동하는 데 필요하지 않습니다. 이 USB Type-C 포트는 iCUE LINK LCD 모듈로 업그레이드할 때 사용됩니다.
팬의 공기 흐름 방향을 어떻게 알 수 있습니까?

팬의 측면에 있는 화살표는 공기 흐름의 방향을 나타냅니다.
쿨러와 선풍기가 빨간색으로 깜빡이거나 작동하지 않습니다. 어떻게 해야 하나요?
시스템의 팬이 빨간색으로 깜박이면, 시스템 허브의 단일 포트에 연결된 iCUE LINK 장치가 너무 많다는 의미입니다. 단일 포트에 연결할 수 있는 최대 장치 수는 12개입니다. 이 문제를 해결하려면 시스템 허브의 사용 가능한 두 포트에 iCUE LINK 장치를 분산시키십시오. 이렇게 하면 연결된 모든 장치에 적절한 전력이 분배됩니다.
문제가 계속 발생하거나 팬이 전혀 작동하지 않는 경우, 다음을 수행하십시오.
- 쿨러와 팬 사이의 모든 연결을 다시 확인하십시오.
- iCUE를 통해 기기들이 최신 펌웨어로 업데이트되었는지 확인하십시오.
그래도 문제가 해결되지 않으면, 지원 티켓을 열거나 https://help.corsair.com/hc/requests/new으로 고객 지원팀에 연락하여 추가 문제 해결 및 지원을 받으십시오.
라디에이터는 어떤 방향으로 설치해야 할까요?

최적의 성능을 위해 라디에이터를 케이스 하단에 튜브가 위치하도록 설치하는 것이 좋습니다(그림 1). 그러나 반전된 위치를 포함하여 다양한 방향으로 라디에이터를 설치할 수 있습니다. 설치 방향에 관계없이 라디에이터의 가장 높은 지점이 CPU 펌프의 높이보다 높아야 합니다(그림 2).
쿨러에 미리 도포된 열전도 페이스트를 다시 설치할 때 재사용할 수 있나요?
iCUE LINK TITAN RX RGB CPU 쿨러를 다시 설치하려면 미리 도포된 써멀 페이스트를 깨끗이 닦아내고 새로운 써멀 페이스트를 도포해야 합니다. 별도로 판매되는 CORSAIR XTM70을 사용하는 것이 좋습니다.
iCUE LINK TITAN RX RGB CPU 쿨러의 특정 부품이나 액세서리를 분실하거나 파손한 경우 어떻게 해야 합니까?
LCD 깜빡임 현상이 발생하면 어떻게 해야 하나요?
전력 등급
시스템 허브 출력 등급: 12Vdc 7A (포트당)
RX120 RGB 입력 정격: 12Vdc 0.66A
RX140 RGB 입력 정격: 12Vdc 0.7A
보증

모든 CORSAIR iCUE LINK 쿨러는 6년 보증이 적용됩니다.
법적
©2024-2025 CORSAIR MEMORY, Inc. 모든 권리 보유. CORSAIR 및 돛 로고는 미국 및/또는 기타 국가에서 CORSAIR의 등록 상표입니다. 기타 모든 상표는 해당 소유자의 재산입니다. 실제 제품은 사진과 약간 다를 수 있습니다.
관련 콘텐츠


