HOW TO
方法Memtest86を実行してRAMの不具合をチェックする
You can use Memtest86 to check for faults in your computer RAM.
Memtest86 is best used for stock and XMP settings. There are other memory tests that can be used for testing the stability of overclocked memory.
Step One: Download Memtest86 onto a USB flash drive
To run Memtest86, you will need a USB flash drive to download Memtest86 on to. You will use this bootable USB drive to run Memtest86.
Once you have your USB drive, download Memtest86 from the following link: https://www.memtest86.com/downloads/memtest86-usb.zip
If you need help with creating a bootable USB, use the included User Guide in the download.
Step Two: Clear your motherboard CMOS
Once you have your bootable USB, make sure your computer is powered off. You need to clear your motherboard CMOS to reset your BIOS to factory default settings.
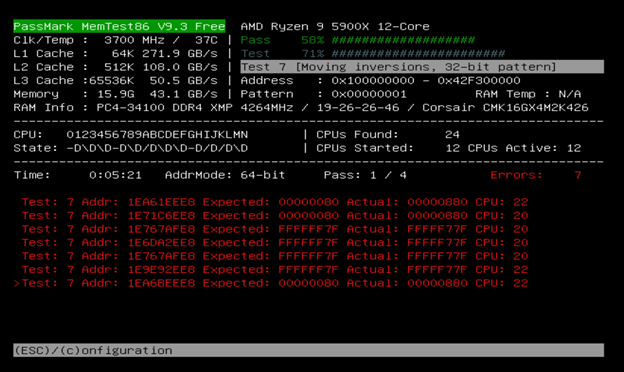
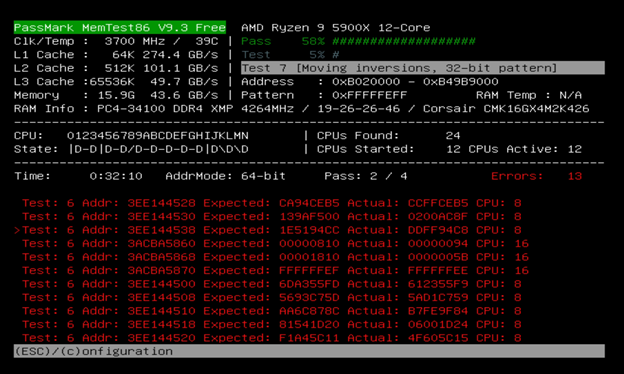
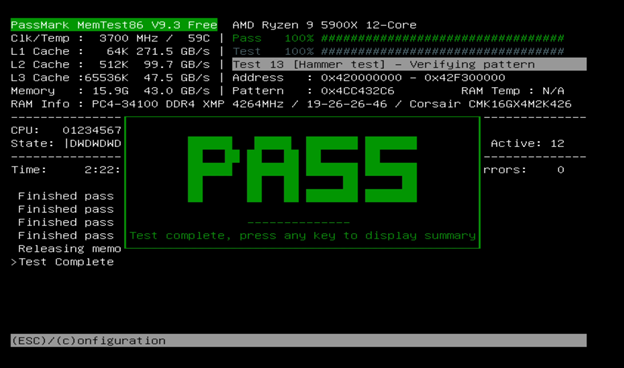
It is important that you do this, as not doing so could cause errors when running Memtest86. See below for examples of errors occurring when the CMOS is not cleared; these examples all use the same kit of memory:
XMP enabled with some tweaking to CPU settings
Overclocking with tweaking of CPU settings
An example of a successful test, with the only change being having XMP enabled
If you are unsure of how to clear your motherboard CMOS, check the manual for your motherboard; some motherboards have a dedicated button for resetting BIOS to default, while others have jumpers you can use to reset to default.
You can also remove the CMOS battery, then put it in again to reset BIOS to default.
Step Three: Run Memtest86
Once you have cleared your motherboard CMOS, plug the USB drive with Memtest86 on it into your computer and power it on. You should not need to press anything; the test will automatically start after a countdown.
Memtest86 is a quick test, taking roughly 1 hour per 8GB of memory. However, this is dependent on the memory configuration. For example, a single stick of 16GB may take 2.5 hours or longer, compared to two 8GB modules taking 2 hours to test.
If you have multiple kits, make sure you test each kit individually, even if they have the same part number. This will help make sure that you do not have an issue of multiple kits not working together, as kits with the same part number sometimes do not run together due to not being in a supported configuration.
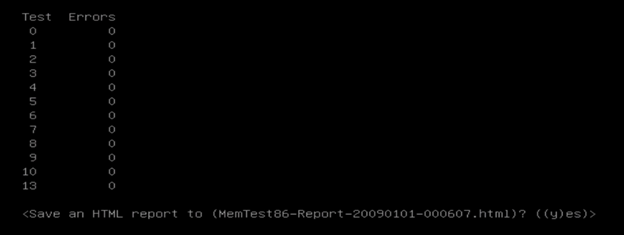
Once the test is completed, you will be asked if you want to save the test results to the USB drive as an HTML file. Make sure you save this file, as you will need to attach this file to a help ticket if you plan on returning the memory kits under warranty.
Final points to keep in mind
When Customer Support assists you with RAM issues, they may request that this test be completed with XMP disabled and at stock settings. If your memory kit is above 3600mHz or is on an older generation hardware (e.g. 2018 or earlier), please refer to this article for more information.
We recommend testing higher speed kits by individual module in order to make sure your CPU and motherboard combination can handle high speed memory. Higher speed kits are defined by platform; for example, 3200mHz with a Ryzen 1000 series chip is considered the high end of the platform, while many B550 boards can hit 4000mHz or higher easily.
関連コンテンツ


