MANUAL | QUICK START GUIDE
iCUE LINK TITAN 240 | 360 RX LCD
EXTREME PERFORMANCE LCD LIQUID CPU COOLER

BEFORE YOU START
GETTING TO KNOW
1. iCUE LINK TITAN RX LCD
TITAN 240 RX LCD

TITAN 360 RX LCD

2. iCUE LINK RX RGB FANS
The pre-installed decorative plate (3) on the RX RGB is detachable. The fan can be used with or without the decorative plate, depending on your preference.

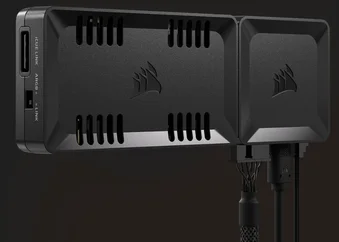
3. iCUE LINK SYSTEM HUB

INCLUDED HARDWARE

1x iCUE LINK AIO Pump Module – LCD (Pre-Installed)

1x Intel LGA 1851/1700
Mounting Bracket Set (Pre-Installed)

1x Intel LGA 1851/1700 Backplate

1x AMD AM5/AM4
Mounting Bracket Set

16x Long Fan Screws (240)
24x Long Fan Screws (360)

8x Radiator Screws (240)
12x Radiator Screws (360)

8x Washers (240)
12x Washers (360)

2x RX RGB (240)
3x RX RGB (360)

1x System Hub

1x 150mm PCIe Power Cable

1x 500mm Micro USB 2.0 Cable

1x 600mm Type-C USB 2.0 Cable

1x 150mm USB Splitter Cable

1x 800mm Tach Cable

1x 250mm iCUE LINK Cable With
Dual 90° Connectors

1x 600mm iCUE LINK Cable With
Dual 90° Connectors

1x 600mm iCUE LINK Cable With Straight/90° Connectors
PREPARE iCUE LINK TITAN RX LCD FOR INSTALLATION
1. CONNECT iCUE LINK CABLES
- Connect the iCUE LINK cables (O, P) into the radiator-mounted RX RGB fans as shown below.

2. ROUTE THE iCUE LINK CABLE
- Route the long iCUE LINK cable (Q) and Type-C USB 2.0 cable (L) through the nearest cut-out from the pump.

3. CONNECT THE TACH CABLE
- Connect the 3-pin, 1-wire tach cable (N) into CPU_FAN header on the motherboard then route it behind the motherboard tray.

INTEL INSTALLATION
1. INSTALL THE BACKPLATE
- Remove protective film from the self-adhesive side on Intel LGA 1851/1700 backplate (C).
- Align the backplate (C) then adhere it with the self-adhesive side behind the motherboard.

2. INSTALL THE PUMP UNIT
- Align the screws and pump over the backplate then fasten the screws in a cross pattern going from opposite corners.
- Tighten the screws (B) until all four corners are tightened.

3. INSTALL THE RADIATOR
- Insert the other end of the short cable (O) into the rear fan then mount the radiator inside the case with the short screws (F) and washers (G) as shown.
- Route the 600mm iCUE LINK cable (P) behind the motherboard tray.

AMD INSTALLATION
1. INSTALL THE AMD MOUNTING BRACKET
- Replace the pre-installed Intel mounting bracket (B) with the AMD mounting bracket (D).

2. PREPARE THE MOTHERBOARD FOR INSTALLATION
- Remove the existing AMD AM5/AM4 mounting brackets shown.

3. INSTALL THE PUMP UNIT
- Align the screws and pump over the backplate then fasten the screws in a cross pattern going from opposite corners.
- Tighten the screws (D) until all four corners are tightened.

4. INSTALL THE RADIATOR
- Insert the other end of the short cable (O) into the rear fan then mount the radiator inside the case with the short screws (F) and washers (G) as shown.
- Route the 600mm iCUE LINK cable (P) behind the motherboard tray.
CONNECT THE iCUE LINK DEVICES
- Insert the 90° connector from the 600mm iCUE LINK cable (Q) and Type-C USB 2.0 cable (L) into the pump.

iCUE LINK SYSTEM HUB INSTALLATION
1. CONNECT THE iCUE LINK CABLES
- Connect the long iCUE LINK cables (P,Q) into the System Hub (I).

2. CONNECT THE POWER CABLE
- Connect the 6-pin microfit connector (J) into the System Hub (I).
- Connect the 6-pin PCIe connector (J) into a dedicated PCIe power cable from the power supply.

3. CONNECT THE DATA CABLE
- Connect the micro-USB cable (K) into the System Hub (I).
- Connect the 9-pin USB connector (K, L) into the USB splitter cable (M) then plug the splitter cable into a USB 2.0 header on the motherboard.

4. CONNECT TACH CABLE
- Connect the 2-pin, 1-wire tach cable (N) into the System Hub (I).

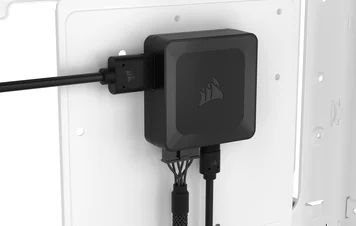
5. MOUNT SYSTEM HUB
- Mount the System Hub (I) inside the case magnetically or with the supplied tape.

SOFTWARE SETUP
VIDEO TUTORIAL
See our comprehensive iCUE setup video guide. This visual guide provides a step-by-step walkthrough of iCUE setup detailed in the writing below.
1. INSTALL iCUE
2. UPDATE FIRMWARE FOR CONNECTED DEVICES
- Once iCUE is installed run the software. If any of the connected devices need a firmware update, you will be prompted to perform an update via a notification in the top right corner. You can also click the settings (cog wheel icon in the top right corner) and check for the software and firmware updates manually.

3. LIGHTING SETUP
Quick Lighting Setup
- Select the predefined Murals effects from the iCUE Home screen to quickly change the lighting effects.

Lighting Setup
The Lighting Setup page will display all iCUE LINK devices connected to the System Hub and allow you to re-order them to better match the physical placement inside your system.
- Mouseover the System Hub tile and select Lighting setup.

- Re-arrange your iCUE LINK devices to match your setup.
- Click on the box icon on the right to display all devices inside the window, if needed.

Lighting Effects
Choose which lighting effect will be displayed when the iCUE software is running:
- Select either the iCUE LINK TITAN RX LCD AIO or RX RGB from the navigation bar.
- Click "Lighting Effects" to access the lighting effects page and select the desired lighting effect.
- Click the "+" icon under "Lighting Layers" to add additional lighting effects.

Device Memory Mode
Choose which lighting effect will be displayed when iCUE software is not running, usually during computer the startup phase:
- Select either the iCUE LINK TITAN RX LCD AIO or RX RGB from the navigation bar.
- Toggle the Device Memory Mode by clicking on the button.
- Once the desired setting is selected, click on the save icon.

4. SCREEN SETUP
Choose which screen effect will be displayed when the iCUE software is running:
- Select the iCUE LINK TITAN RX LCD AIO from the navigation bar.
- Click "Screen Setup" to access the screen setup page.
- Select the desired screen setting.

Device Memory Mode
Choose which screen effect will be displayed when the iCUE software is not running, usually during computer startup phase:
- Select the iCUE LINK TITAN RX LCD AIO from the navigation bar.
- Toggle the Device Memory Mode by clicking on the button.
- Once the desired setting is selected, click on the save icon.

5. COOLING SETUP
AIO Fans Setup
- Select the iCUE LINK TITAN RX LCD AIO from the navigation bar.
- Click “Fans Setup” and click "Run Wizard".

Identify which fan(s) are mounted on the radiator. iCUE will automatically assign the AIO-based fan curve for the selected fans.
- Select the fan(s) that are mounted on the radiator by clicking on the UI then click "finish".

Cooling Performance
Select your desired cooling presets for any other fans connected to the System Hub between Quiet, Balanced, Extreme, or create your own curve:
- Select either the iCUE LINK TITAN RX LCD AIO or RX RGB from the navigation bar.
- Click "Cooling" to access the cooling performance page.
- Select the desired cooling preset for each device.
- Click the "+" icon under "Cooling Presets" to create a custom fan curve.

Device Memory Mode
Choose how your fan(s) and/or pump will perform when the iCUE software is not running, usually during computer startup phase:
- Select either the iCUE LINK TITAN RX LCD AIO or RX RGB from the navigation bar.
- Toggle the Device Memory Mode by clicking on the button.
- Once the desired setting is selected, click on the save icon.

5. ADDITIONAL SETUP
Visit our CORSAIR LAB YouTube channel and Explorer page for additional setup, configuration and tips:
FAQ
Is it safe to use an alternative PCIe adapter cable to provide power to the System Hub?
To ensure proper operation of the System Hub and iCUE LINK devices, please connect the supplied 6-pin female connector directly to a dedicated PCIe power cable from the power supply. Connecting an adapter cable such as a SATA to PCIe between the System Hub PCIe power cable and power supply may negatively impact the performance of your iCUE LINK devices and/or system overall.
What is CapSwap technology and how does it work with the iCUE LINK TITAN RX LCD CPU coolers?

With CapSwap, you can easily replace the pump cap with an aesthetic module like the iCUE LINK Pump Cap - Groove (sold separately) to customize your iCUE LINK TITAN RX LCD CPU cooler. Visit this link for a list of compatible CapSwap modules.
How do I know the direction of the airflow of the fan?

An arrow located on the side of the fan indicates the direction of airflow.
My cooler and fans are blinking red or not functioning. What do I do?
If the fans on your system are blinking red, this is an indication that too many iCUE LINK devices are connected to a single port on the System Hub. The maximum number of devices that can be connected to a single port is 12. To resolve this issue, please distribute the iCUE LINK devices across both available ports on the System Hub. This will ensure adequate power distribution to all connected devices.
If you continue to experience issues or find that the fans are not functioning at all, please perform the following:
- Double check all connections between the cooler and fans.
- Ensure that your devices are updated to the most recent firmware via iCUE.
If this does not resolve your problems, please open a support ticket or contact our customer support team for further troubleshooting and assistance at https://help.corsair.com/hc/requests/new.
In what orientation should I install my radiator?

For optimal performance, we recommend installing the radiator with the tubes positioned at the bottom of the case (Figure 1). However, you have the flexibility to install the radiator in various orientations, including an inverted position. Please ensure that the highest point of the radiator is elevated above the level of the CPU pump, regardless of the installation orientation (Figure 2).
Can I reuse the pre-applied thermal paste on the cooler for re-installation?
Re-installation of the iCUE LINK TITAN RX LCD CPU cooler will require you clean off the pre-applied thermal paste and apply a new layer of thermal paste. We recommend using CORSAIR XTM70, sold separately.
What should I do if I lost or broke a specific part or accessory from the iCUE LINK TITAN RX LCD CPU cooler?
POWER RATING
System Hub Output rating: 12Vdc 7A (per port)
RX120 RGB Input rating: 12Vdc 0.66A
WARRANTY

All CORSAIR iCUE LINK coolers have a 6-year warranty.
LEGAL
©2024 CORSAIR MEMORY, Inc. All rights reserved. CORSAIR and the sails logo are registered trademarks of CORSAIR in the United States and/or other countries. All other trademarks are the property of their respective owners. Product may vary slightly from those pictured.
RELATED CONTENT