HOW TO
Comment faire : Configurer les blocs d'alimentation Corsair dans iCUE 4 ou plus récent
To help you set up your power supply units (PSU) after updating iCUE to version 4 or newer, we have prepared a video and guide for you.
Video instructions
Managing cooling settings
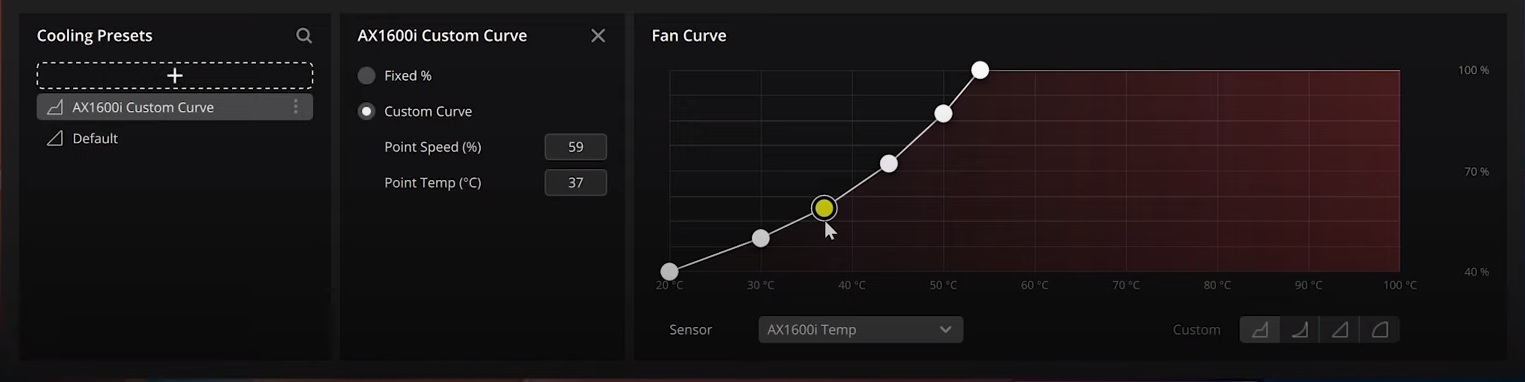
Corsair PSUs come with a default fan curve, but you can create your own cooling presets using iCUE.
NOTE: When creating a custom curve for cooling, we recommend using your PSU's internal temperature sensor.
To create a cooling preset:
- Select your PSU in iCUE.
- Click Cooling in the left menu.
- Click the + button in the Cooling Presets window.
- In the Custom Curve window, select whether you want a Fixed % or a Custom Curve.
- Adjust your curve in the Fan Curve window.
Setting up alerts
In iCUE, you can set up alerts to trigger certain system behaviors at specified temperatures.
To create an alert:
- Select your PSU in iCUE.
- Click Alerts in the left menu.
- Click the + button in the Alerts window.
- Use the toggles in the Temperature alert window to enable certain behaviors.
- For enabled behaviors, set what temperature value you want the behavior to trigger at.
- Assign the alert to your PSU's temperature sensor by clicking the dropdown menu under the desired temperature readout.
Managing additional settings
You can access the device settings of your PSU by selecting your PSU in iCUE and clicking Device Settings in the left menu.
In the device settings of your PSU, you can:
- Switch the PSU mode between single rail or multi-rail
- Toggle overcurrent protection settings for individual rails
- Set max amperage for individual rails
NOTE: We do NOT recommend changing these settings unless you absolutely know what you are doing. Changing these settings may cause issues with your PSU.
Monitoring PSU performance in iCUE
If you want to monitor what your PSU is doing, you can set a widget on your iCUE dashboard to get real-time information.
You can also add sensors to your iCUE home screen, which will also provide real-time information.
To set a widget:
- Click Dashboard near the upper left of iCUE.
- Click the Add Widget button on the upper right of iCUE.
- Toggle on the widget for your PSU and then click Apply.
- If you want a closer look at specific information, drag and drop the relevant tiles from the widget onto the dashboard
To add a sensor to the home screen:
- Go to the iCUE home screen.
- Click the + button next to Sensors.
- Select your PSU in the ADD SENSORS window.
- Select what information you want to display in the sensors.
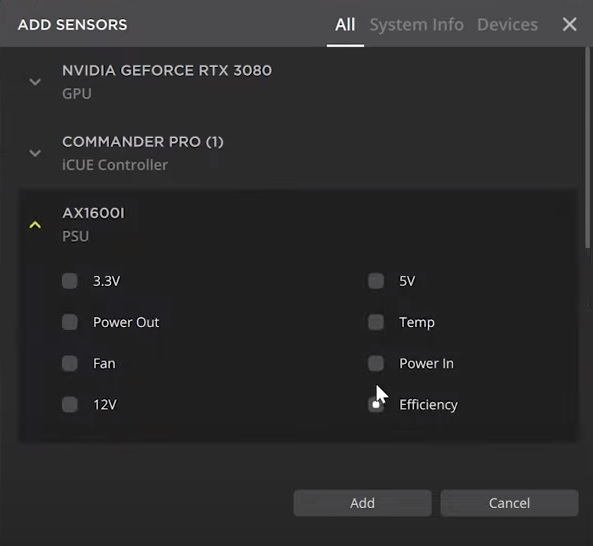
- Click Add.
JOIN OUR OFFICIAL CORSAIR COMMUNITIES
Join our official CORSAIR Communities! Whether you're new or old to PC Building, have questions about our products, or want to chat the latest PC, tech, and gaming trends, our community is the place for you.